So really when we are talking about how a Unity project is laid out on disk (which seems an odd archaic reference, since I'm using an SSD these days), we're talking about the Assets folder.
The Assets Folder, and You
This is the place to lump all your spiffy 3D models, code files, and whatnot. Just drop everything in and watch it go, right?
Well, yes and no. Other than the previously mentioned 'special' folders, Unity doesn't force any sort of organizational method on you. This is pretty much in keeping with actually developing things in Unity. It is very open about how you go about things (everything saved in hand-built scenes? Everything created programmatically? One scene that loads everything, multiple separate scenes?).
It's nice that a strict structure isn't forced on you (and reasonable, as well, since Unity is a general game engine and different scopes and genres definitely demand different things). The down side is, well, where do you begin? What's good and what's bad? How might things come back to bite me later?
The good news is that you really can't destroy yourself with poor file organizational structure. Unity doesn't care; it will just compile and run everything.
You, however, may never be able to find that particular script you want to edit. Or that particular material you want to put on an object.
That's the real trick with the physical file organization: keeping a logical structure where you can find what you are looking for, and ideally find things that are related to it.
Related? Here's what I mean by that. Say I'm creating a Civilization clone. I have one scene that's the main map (where you spend most of your time). Another would be the city-details screen. Another might be a screen that shows the tech tree.
The scene with the tech tree would, for example, probably have several scripts. One that controlled the overall scene, as well as entry and exit to it. Maybe another that governed laying out the icons representing the tech tree and the squiggly lines to and from each node. And another script that handled the information popup when you clicked on a node in the tech tree.
All these scripts are intimately related to one another, at least in purpose if not tightly coupled code-wise. So it is definitely nice to have these scripts separated from all the others in your program (they have nothing in common with scripts for animating soldiers in combat, or for dragging citizen icons around between mines and farms, etc.).
So, the easy, common, and generally correct idea is to create a folder for each scene, and have the Unity scene file and all the scripts needed for it in one directory.
That works pretty well, but of course often you have objects and scripts shared between screens (say, UI scripts for a top menu bar, or a options menu if you hit ESC, for instance). Also, if you're a Civ-style game, you have whatever your central repository of game-data is. That has to live somewhere outside a specific screen (you don't want to lose your entire game-state if you switch to the City or Research screen!).
So, the simplest model really doesn't work for anything complicated. I'll set out how I organized a modestly complicated project: this is how I've laid out JumpShip, which is really an evolution through Rogue Moon->Retrograde->Dungeon Inspectors.
JumpShip Project Layout
This is how I have my project set up at the top level. I'll go through the entire thing and lay out my reasoning. Your setup may, and probably will, differ.

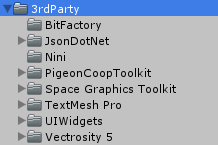
3rdParty
 This is where I generally keep all third party content. I'm not talking single scripts that I might grab for something; if those are specific they go in more specific places. Rather this is for larger things, such as Asset Store items, or large code projects.
 This includes the go-to assets I almost always use: TextMesh Pro, Vectrosity, JsonDotNet, and a few others like logging frameworks.
Once I import an asset I simply drag it to the 3rdParty directory, and am done with it. That said, I often prune things out of the asset I don't need, example directories and scenes, for, err, example. This is mostly stuff I've seen and don't really need bloating the size of my project and making it take longer to compile. And believe me, adding half a dozen 'sample' and 'example' scenes and files really does eat quite a lot of space.
Pruning this stuff is also in your interest if you're using any sort of version control software (and you should be!!!). While these example files aren't going to change, you don't really need them and bloating your repository needlessly is, well, needless. That said, rather than deleting the examples you can set the example files and directories to be ignored by your VCS. That's typically what I do until I decided I don't need whatever examples anymore, at which time I delete them. If I really want to see them again I'll just create and empty project and import into that, and delete the whole thing when I'm done.
Occasionally there are assets that only want to live in the root of the project. Sometimes simply re-importing fixes whatever errors they have. In some cases there are hard-coded paths (this often seems to be in shader include files for some reason). I don't generally have much of a tolerance for this, and will bite the bullet and fix up the code. Unfortunately that means if I re-import the project, say to upgrade the version, I'll lose those changes.
Fortunately this is really rare.
Animations
Well, this is where I put animations. Or actually FBX files that contain animations, generally. There aren't any in JumpShip currently, so this is empty. I don't know if there will be any as JumpShip is pretty simple, graphically.Editor
 The Editor folder is one of those special folders to Unity. Specifically it contains scripts that can run inside the Unity editor, rather than just in the Player (i.e. they can be build/development time scripts as well as run-time scripts). These scripts are usually some time of editor gadget, or effect.
All I have here is this project is the editor for the Standard Asset post-processing image effects.
Fonts
Unsurprisingly, this is a directory holding fonts. I do also put the TextMesh Pro assets created from fonts here, as well. Unexciting but necessary. There's no reason this stuff should be scattered all over your project.Materials
I try to keep all materials here. Sometimes if I use a material from a 3rd party asset I'll move it here. I only do that if the material is from an example in the asset and not part of it's core. That way when I blow away the asset's examples directory (95% of which I don't need) I'll still have that one bit I used.
In the case of materials created from imported models, I like to keep all the materials for the project together so I move them here. These days the materials are the same a lot of times (Standard Shader), differing only in the textures.
Again, as JumpShip is currently very graphically simple, there isn't a lot here, other than sprite-type materials for the map indicator icons, and for the various lines and trails.
Models
Again, unsurprisingly: model files. Thus far JumpShip is all sprite-based. I do plan to add low-ish poly ship models that show when zoomed in close. Currently the models from Rogue Moon/Retrograde are imported. I may or may not use them.
Plugins
Another Unity special folder. The Plugins folder is where you want to put native DLLs that will be included in your project. The only thing currently here are the DLLs for Vectrosity.Prefabs
So now we're getting to more interesting stuff. In case you don't know, a 'prefab' is an object that is created in the Unity editor and 'saved' (i.e. serialized to disk). This is very useful. For instance you could create an empty object, then add a model as a child (like one of the above Retrograde spaceships). Then add to it all the scripts required to control it, make it move, explode, fight, etc. Once everything is set up correctly you save the prefab, and bingo, you can now instantiate that object over and over from code. As the object isn't part of any particular scene, it is now easily reused anywhere in your project, at any time. I think that prefabs, and the instantiating thereof, are one of the most important concepts in Unity.
I have only a few categories of prefabs in JumpShip right now: Map objects and UI objects.
The Map objects folder contains Astronomical bodies, Ship, and the Star Map icon. The AstronomicalBody folder just contains prefabs for the star system screen entities: stars, planets, asteroids and moons. Ship contains a single prefab that represents a ship or fleet on the map. This will definitely get more in depth later.
The UI folder contains, gasp, UI prefabs: Buttons, ListView, Tabs and Treeview. The Button folder just contains standard Unity UI buttons where I have replaced the Text object with a much better looking TextMeshPro object. There are a few standard colored variants.
ListView, Tabs and Treeview are prefabs made from the UIWidgets asset. I've customized the code a bit for these items, as well as changed images, sizes, etc, to fit the look of my games. Having the prefabs customized and colored exactly as I want, I can just drag them onto a given UI canvas and they appear exactly as I desire (of course you can then customize that instance further, if you want).
You could definitely save the prefabs in the various scene folders. It's very unlikely I'll ever use the star/planet/moon icon prefabs, or the ship icon prefabs, anywhere outside of the star system map scene. The code for these objects (selection, zooming-to, etc) is pretty inextricably linked to that scene. However, I still feel that having all your prefabs located together is good. You never have to hunt for them if you do want to use them in multiple places.
Resources
Another special folder. Most assets in Unity are included in the final build if, and only if, they are actually referenced somewhere (i.e. used in a scene). But of course not everything is like that. What if you want to dynamically load objects, rather than placing them by hand in the editor? There won't be a solid link, so they wouldn't be included in the final build.Well, they will be if they're in a Resources folder (you can have multiple, and they don't have to be in the root). Anything in a folder called Resources will be automatically included in an actual build.
Further, there are built-in routines for loading items out of the resources folder. This is very handy.
In JumpShip I have, as we saw above, prefabs for the astronomical bodies that show up in the star system view. Each of these prefabs has an IndicatorHandler script that, based on the type of body (star, planet, moon, etc), loads a given sprite:
sprite = Resources.Load<Sprite>("Sprites/StarSystem/MapIndicatorStar");
or
sprite = Resources.Load<Sprite>("Sprites/StarSystem/JumpPoint");
or
sprite = Resources.Load<Sprite>("Sprites/StarSystem/MapIndicator"); //generic planet/moon
Note that this IndicatorHandler and sprite is on a child object of the astronomical body. This is because the indicator scales based on the camera's orthographic zoom level to stay a constant size. I don't want to scale the root node as there may be moons or other things hanging off of it, so the indicator sprite is on a child object, and only that scales:
    //Hide indicator sprite if we are a star, and are close.

    private void OnCameraZoomLevel(float zoom)

        {

        //Under a certain level (for stars) we hide the icon and show a 3D object

        if (Camera.main.orthographicSize < sceneControl.HideStarIndicatorOrthoLevel && isStar)

            spriteRenderer.enabled = false;

        else

            if (!spriteRenderer.enabled)

            spriteRenderer.enabled = true; //outside hide distance.  Show indicator sprite.


        }
If we zoom in enough, the star indicator sprite is replaced by an actual 3D star object. Originally I was doing this with all the planets and moons, but I removed it as, well, on the scale of a solar system planets and moons are incredibly small. I may put this back, I may not.
Scenes
 |
| Current Scenes in JumpShip |
Most of my projects have been no different. As JumpShip is kind of a 4x game, it has some of the very typical screens you'd expect: a galaxy/stellar map, a star system map. A Research screen, a colony view screen. Ship design. Main menu and options screens. All these are separate scenes.
There are a couple of jokers in the scenes deck, and I will likely be adding more.
In Unity 5 (5.3 I think it was) Unity Technologies redid their scene handling. Now there's an object called 'SceneManager' which allows multiple scenes to be loaded and/or edited at once. This is pretty powerful (though initially when I upgraded it did break a few things for me).
I'm currently using this in my UI. There are basic headers at the top of virtually every screen that shows general information for your empire, allows you to switch screens, and controls the flow of time (fast, paused, etc). These are the same everywhere. Previously I'd have added these as a prefab on every screen, somewhat tedious and bloating up every scene with repeated, constantly identical objects.
| ScreenSwitch Scene. Not much there. |
However, it dawned on me that the new ability to load multiple scenes could solve this. So I created a separate 'ScreenSwitch' scene that contained the UI for switching screens.
 |
| Time Control Scene |
Both of these scenes are loaded programmatically in the SceneControl script in every scene that needs them:
                SceneManager.LoadSceneAsync("TimeControl", LoadSceneMode.Additive);

                SceneManager.LoadSceneAsync("ScreenSwitch", LoadSceneMode.Additive);
So the functionality of those two controls is completely separated out from the individual scenes they appear in. Again, this could have been done using prefabs, but I feel like this is a little cleaner. I'll probably continue to use this method of composing the UI.
 |
| Folder for SystemScreen Scene |
I keep only those files in the script folder. This keeps things nice and clean, and makes it easy to find what I'm looking for. Note that this does include scripts on prefabs, if the prefabs are used only in this scene. If the prefab is more general I would put it elsewhere (\Scripts\Prefabs, likely).
This leaves the scene folder pretty clean. Most of the scenes are gameplay, menus or the like. There is, however, once special scene: Startup.
The Startup scene has only two objects, the MasterControl object and the SceneControl object (every scene in JumpShip has a SceneControl object and script, save the additive ones.
The MasterControl object is our don't-destroy-on-load object that will stick around for the life of the game. The MasterControl script is the main hub of the game, and contains all our startup, setup and game data. On startup it simply registers as DontDestroyOnLoad(this) and sets up a file logger.
The SceneControl just waits for the end of frame, the triggers a switch to the LoadData screen. There the MasterControl script will load all the setup data for the game, with the LoadData scene control script providing a nice progress bar, etc.
From there you'll move on to the main menu, and load or start a new game.
There's a subfolder, Tests, in the scene folder. When I'm experimenting with something I'll make a subfolder in Tests for each specific item I'm fooling around with. All the experimental code and objects are confined to this folder. If it works out, I'll promote them out and into the main structure.
Scripts
This folder is for, well, general scripts. Not everything is categorized as part of a single scene, or as part of the game system (simulation engine, save game data, etc).So what goes here, in my projects? Generally scripts for prefabs that are shared across many scenes. For JumpShip currently that is mostly UI objects. I've mentioned that I'm using the nice New UIWidgets asset. The code included there has saved me a lot of time setting up UI objects (selection lists, treeviews, etc) that Unity doesn't naively have. However the provided scripts don't work for me in all cases, so I've customized them quite a bit (in some cases it was as easy as simply deriving from the provided classes. Sadly in some cases I had to copy and change).
In any case this folder contains subfolders holding the customized scripts for a ListView, Notify dialog and SlideBlock. Also there's a script for creating curved TextMeshPro text, though I need to revisit that one a bit.
In any case, Scripts is for general scripts. I'm not completely happy with having what could be considered a general dumping directory, but not everything is easily categorized, and I decided I wasn't going to lose any sleep over that.
Shaders
Not much to say about this. This is where I put custom shaders, of which JumpShip currently has zero. I will copy my grid-line shader over from Retrograde at some point and put it on the map screen. I just haven't done so yet.Standard Assets
You get this folder when you import Unity's Standard Assets. There is lots of useful and informative stuff here. I don't need most of it, so the only thing I actually have imported is the image effects. Which I'm currently not even using. I'm probably going with some sort of toon shading as the main look of JumpShip, though. Not that there is currently anything to shade besides the UI and some sprites.System
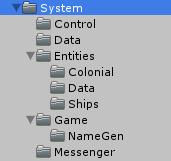 This is, even more than the scenes folder, the core of the game. I'm not going to go into a lot of detail as I'll talk about this very heavily in the 'Logical' layout post.
What's here? Well, everything that drives the game. The main MasterControl script that is created at startup. GameData, which contains the current state of the game, and serializes/deserializes to save and load the game. All of the entities involved (StarSystem, Star, Planet, Moon, Ship, Fleet, Empire, etc.). Also the Messenger class, which I make extensive use of. I'll talk quite a bit about that one later.
In other projects (say Dungeon Inspector or Rogue Moon) the networking code largely goes here as well.
It's the code in System that really drives the game; otherwise it is just a collection of scenes with no structure or game data behind them.
Textures
Holds the textures, unsurprisingly. Textures are inextricably linked to Materials, so in some cases it is common to keep them together. I find it more logical and cleaner to separate them out into their own directory, and then in to further subdirectories: UI, Vector Textures (for Vectrosity lines), StarSystem (for the star system bodies icons), etc.Note that this is texture and sprites.
Whew
That was quite a lot. In any case, that's the file layout I've sort of ended up with. This seems to work nicely, and keeps things well separated. I'm open to any bright ideas, though most of what I've read and seen is at least somewhat similar to what I do.In any case, I hope this proves useful. If nothing else it is documentation for myself somewhere down the road!
No comments:
Post a Comment